In Spring 2014 I took 2.72: Machine Design with Professor Culpepper. The class taught us how to bring together the skills we acquired in our engineering fundamentals curriculum and apply them in designing and building a small, functional lathe. Working in teams of 5-6 people, we learned to work through the entire design process, starting with analyzing the problem, to designing and machining parts, to testing the design and making it fully functional. I described some of the skills I learned below. You can also read my team's three design review presentations.
2.72 MACHINE DESIGN

Defining the Problem
The first thing we did as a group was analyze the loads on the lathe so that we knew what we had to design to. Once we had drawn a comprehensive free body diagram, we calculated the cutting forces that we would see. We also wrote a table of functional requirements listing qualitatively and quantitatively what the lathe would have to be able to do. These requirements ran from basic cutting requirements, to being robust enough to withstand Prof. Culpepper's "Death Test" (a drop test, excessive weight on the carriage and a sledgehammer test). We set machine life requirements, and then some requirements for individual components.
Designing and Building Parts
Once we had defined the functional requirements, we worked through designing each sub-assembly to meet those requirements. For each sub-assembly, we defined the load profiles it would see. We also knew which dimensions we could control and which were pre-defined based on the parts we were given (such as the chuck and some of the larger bearings). We plotted out how changing the key dimensions would affect the design's performance and then selected dimensions that would optimize the lathe's performance. In some cases (such as designing the cross-slide), we also used the Solidworks FEA package to design parts for high load situations.
Once we had settled on a design for all the parts, we had to create complete engineering drawings and manufacturing plans before we were allowed into the shop to cut chips. Over the course of the semester, we used a combination of mills, lathes, water jets and plastic thermoforming machines to build our lathe.


Testing the Design
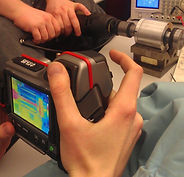
Throughout the course of the design process we conducted tests to make sure our design was meeting our requirements. After building our spindle we did spindle runout tests. We also connected the spindle to a handheld drill and ran it at high speed while photographing it with an infrared camera to determine how much it heated up. Once the lathe was built we did cutting tests and tweaked the design prior to the final "Death Test."
The Final Result
My team's lathe won the final competition and passed the "Death Test." We were very proud to just have made it through such a rigorous class. You can read our team's design review presentations below.